October 29, 2012

Sandra's Brick Template Tutorial

Another Brick Template Tutorial
this time with  Sandra Wallace.


I LOVE the new range of Templates that Twiddleybitz have

recently released... so many options!!
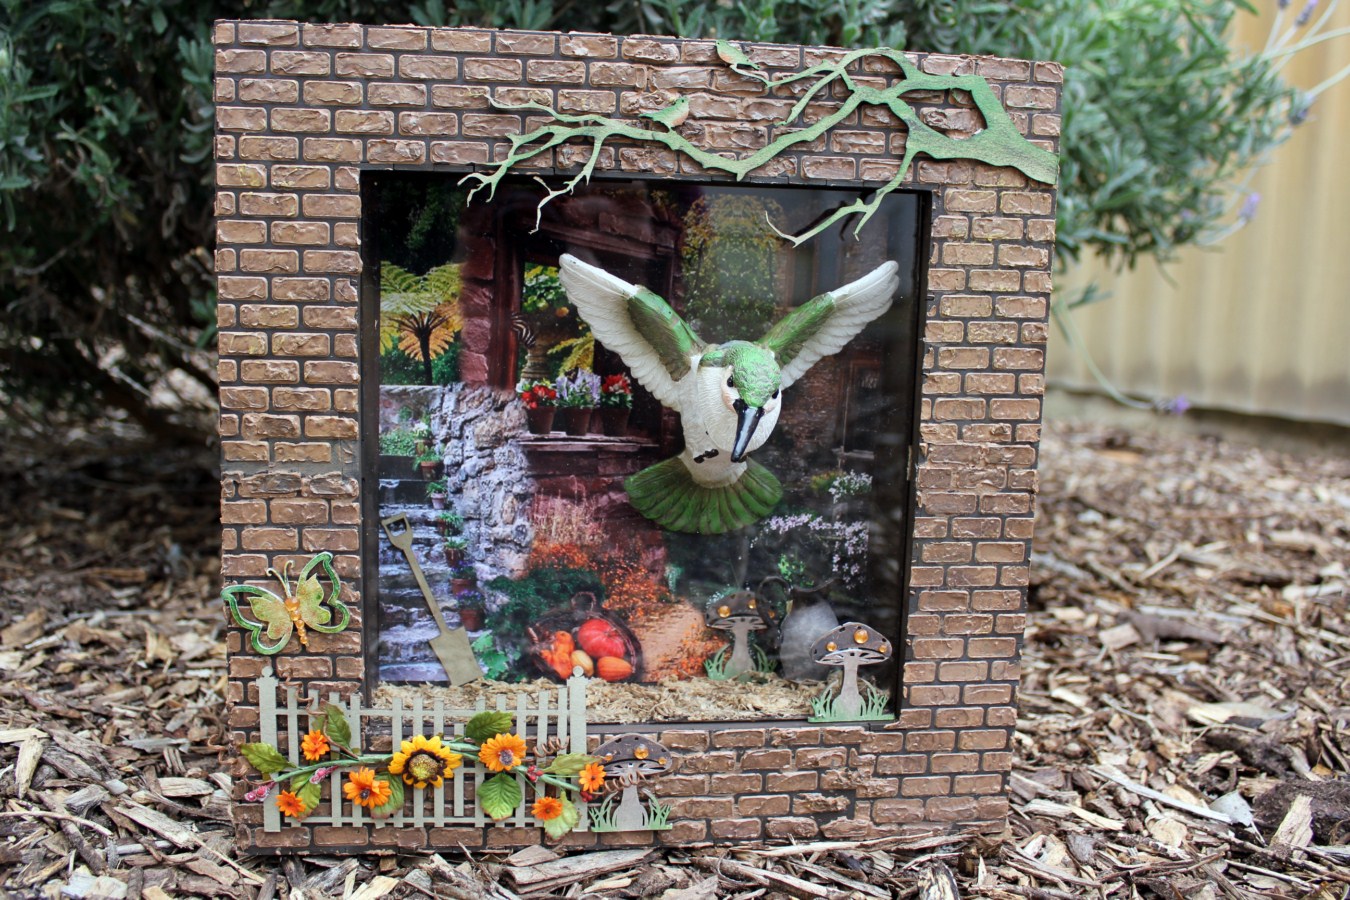
For my Floating Bird Frame I used the
Brick Template TEM007
But for the purposes of this tutorial I have used the
Chevron Template TEM008
(because I have misplaced my Brick Template after a retreat!! eek!)
To create the Brick effect on my floating frame I used the following steps in the tutorial.. repeating
steps TWO to FIVE over and over again until the frame was completely covered.

Products needed for the Brick effect.
Brick Template TEM007 (I used Chevon TEM008 in these instructions)Mont Mart Clear ImpastoChromocryl Paint: Burnt Umber
Kaisercraft paint: Mocha
Versa Inks: Pinecone and Black
Gilding wax: Gold and Patina
an old knife
heat gun
daubers
Here I have used the middle part of a Twiddleybitz overlay to help demonstrate this technique.

Step ONE
Paint the base of your project with the Burnt Umber (or dark brown) paint
 
Now mix up you Impasto with the Mocha paint... making sure to mix it well.
Please note my Impasto is OLD!!! (I'm talking Stone Age!!) and it has lots of lumps in it...which might of helped with the end effect. :-)
Maybe this might be a good time to scrape the crusty bits off the top of your impasto container and put them to good use. ;-)
Step TWO
Once mixed together place your template on the area you wish to work.
 
Step THREE
And then spread your Impasto mixure roughly with your old knife.
It doesn't matter if it is a bit messy, lumpy or uneven, this will add to your end result.
 
Step FOUR
Carefully lift the template off and wash it straight away! (it is really is stubborn to clean off once it dries...trust me!)
 
Step FIVE
Dry using a heat gun.

 
If you are covering a frame or a large area, repeat steps TWO to FIVE until area is covered. (remember to wash template between applications!)
You will probably notice some white lumpy impasto pieces ... don't worry, these will be covered up with the following steps
 
Step SIX
Using a dauber apply Pinecone ink randomly to the bricks.
 
 
then add some Black ink in the same manner
 
 
then rub in some gold gilding wax
 
 
and maybe some patina gilding wax.
and then keep re applying the different inks and waxes until you get the result you like.
 
I hope you enjoyed this tutorial and it has inspired you to try this technique yourself.
Maybe you would like to try a more Terrecotta look with your bricks?.. adding more reddish tones,
Or sandstone bricks?..adding a lighter colour to your Impasto and using beige coloured inks.
Have fun experimenting!!
The above piece of brickwork won't go to waste.. I think I might try to incorporate it in a future layout.
waste not, want not. ;-)
Here are some more photos of my 3D Floating Bird Frame, which uses the above technique.
 
 
Thanks for stopping by!!
If you DO use the Twiddleybitz templates along with other Twiddleybitz products on a creation,
please share them with us in the Twiddleybitz Ning Gallery... we would LOVE to see them!!
Bye for now
 
 
Sandra xx

October 22, 2012

Altered Book Step by Step

Hi Twiddley Fans,

Create a keepsake for someone special or for yourself.  Mini Albums are a fabulous way of showcasing a series of photos.

Today TRUDI HARRISON shares a step by step for recreating her altered Twiddleybitz BK014 Book.


Altered Book by Trudi Harrison

Materials:

Twiddleybitz BK014
Twiddleybitz BAN003
Twiddleybitz GAR006
Twiddleybitz BOR016

Other:

Patterned Papers: The Scrapcake ‘Bright Side of Life’ – 2 x Blue Mornings, 2 x Full Pockets, 2 x Natural Beauty, Simple Pleasures
Assorted Blooms
Kaiser Sentiment Rub-Ons: Childhood and Dream
Ribbon
Ink – Pale Pink and Blue, Aged Mahogany Distress Ink
Paint – White or Picket Fence Distress Paint
2 x Kaiser Album Rings
Album Closure - Optional

***

INSTRUCTIONS

STEP 1

Paint Decorative Chipboard Elements on the cover and the filigree edge on the insert page. Remember to paint the reverse of the filigree edge.  Allow to dry

STEP 2

Use Patterned Papers to cover all pages.

As a guide:

Page 1 (the cover) – The ScrapCake Bright Side of Life – Blue Mornings.  Position so that some of the floral design features.
Before completely covering the reverse side (page 2) with patterned paper, a decorative journal piece cut from The ScrapCake Bright Side of Life’Natural Beauty’ was added.  It only has to be large enough  to cover over the window part.  You may like to do the same.
Page 2 (reverse  of cover) and Page 3 – Blue Mornings
Page 4 (revers of page 3) and Page 5 – Full Pockets (Beige Patterned Side)
Page 6 (reverse of page 5) and Page 7 – Full Pockets (Pink Side)
Page 8 (reverse of page 7) and Page 9 – Blue Mornings
Page 10 – Back Cover – Simple Pleasures (Striped Side)

STEP 3

Cut journal spots cut from the reverse side of Natural Beauty and attach to pages.


 Position photo’s over the top.


Add hand cut, punched or die cut elements from scraps of patterned papers.


Embellish with flowers and Twiddleybitz chipboard accents -  Cut the border and banners into smaller pieces and attach accordingly.  Paint or ink in colours to coordinate -  I used pale pink and blue.


Add  sentiment rubons or journaling.
Ink all the edges of the pages.  


**TIP** For a less bulkier album embellish with less flowers

STEP 4

Decorating the Cover

Attach front window overlay.
Remove bike element from Twiddleybitz GAR006 and paint.
Attach to the front when dry.
Arrange and attach an assortment of blooms.

STEP 5

Bring the album together with 2 x Album rings.
Add ribbon bows to rings to decorate.

STEP 6

Oppitional:  Add album closure – I used 2 x metal tabs which were glued to the front and back covers. Ribbon was threaded through and album tied closed with a bow.

Happy Creating!!


October 19, 2012

Time for Tea

Hi Twiddley Fans,

Our Design Team Member Jennifer Hodge loves making 'Step' Cards.


  Jen shares with us today her creative process.

*****
Creating a 'Step' Card with Jennifer Hodge

I LOVE to make Step Cards.  I love the depth these cards give to the greeting and/or occasion and I was in a girly mood the other night so this cute Tea Party invitation/thank you card was born :-)


And from another angle so you can see the other teacup


Ingredients:

Twiddleybitz Pre-cut Cardstock - Cream Shimmer
Twiddleybitz - Tea Party Word (WOR067)
Twiddleybitz - Teapot & Cups (TEA001)
Kaisercraft - Patterned Paper: The Lake House
Flourish With A Bling - Pearls, Copper
My2Angels - Mini Rose Buds, white
Manorhouse Creations - Petite Roses, Marshmellow (MHCpetimars)
Matisee Derivan - Kindy Glitz, clear
Range/Tim Holtz - Distress Ink, Antique Linen
Range/Tim Holtz - Distress Ink, Brushed Corduroy
Range/Tim Holtz - Distress Crackle Paint, Tattered Rose


Process:

  I started by adhering my card base to the template I made


 Then I turned it over and used a bone scorer on the (horizontal) fold lines


 I used a craft knife on the two (vertical) cut lines


 I removed it from the template, and folded along the fold lines


 I then made inserts for the 3 panels - .5cm smaller than the area so there was a .25cm border
 Ink all pieces, all the way around - including the card


 I attached them to the front of the card and painted and decorated my chippy


  I inked the outer edges of the embellishments, worked out the placement, and adhered them

   Wallah!!! all finished!


 Happy Creating!


October 17, 2012

A Memory House Alteration with Leeann Pearce

Hello Twiddley Fans,

LEEANN PEARCE has done a fabulous job of altering our brand new MDF House Memory Tray.
You can't help but smile at this totally sweet creation, totally wall worthy indeed. 

Leeann shares her creative process:


House Printer Tray by Leeann Pearce


Twiddleybitz product list:     
                           
MDF 033 House printer tray                                            
NERO008 Nero Wrought Iron Fler De Lys                       
ALPHA005B Itty bitty alphabet black                                
XMAS010 Chipboard Christmas advent house             
CUST001 Birds and Trinkets                                         

Note: Only One of the scallop borders was used from the Christmas advent house

List of other NON Twiddleybitz materials:

Gesso
Hambly clear stickers
Hambly washi tapes
Bella blvd washi tapes
Amy tangerine washi tapes
Hambly printed overlays
Prima decorative wood tiles
Prima ruby violet embellishments
Prima rose
Unknown hand painted home tile
 AC-Dear Lizzy chipboard tag
Tim Holtz bingo number
Tim Holtz distress stain, mustard seed, stormy sky rusty hinge, fired brick
A flair for buttons
Kaiser bling
Studio calico wood veneer cameras
Little birds and metal knob unknown
Basic Grey PB&J Chevron pattern paper


Step 1: Prima all the raw chipboard with gesso 2 coats
Step 2: Spatter distress stain randomly over the base of house.
Step 3: Embellish randomly with strips of washi tape.
Step 4: Glue all the primed chipboard pieces together.
Allow to fully dry
Step 5: Start arranging and adhering clear stickers.
Step 6: Arrange other embellishments and adhere in place.
Step 7: Print and trim photo to fit in box.
Step 8: Cover chipboard squares in pattern paper and adhere to house.
Step 9: Cut to size hambly printed overlays and glue in place.
Step10: Finish off by adding the rest of your embellishments and washi tape to floor and roof.
Step 11: Touch up any areas with white paint.

Tips:
- Use liquid clear drying glue.
- Allow correct drying time.
- Pre-arrange all embellishment before gluing in place.


 Happy Creating


October 15, 2012

'She Art' by Tracey Henly

 Hello Twiddley Fans,


Today TRACEY HENLY has a tutorial on using alcohol inks to colour your chipboard.


“SHE ART”
Designed by Tracey Henly


To start paint your chipboard in a pale colour I have used white.


Then cover it generously in clear crackle paint and let dry.
Take co-ordinating coloured alcohol inks, I have used 4. Raisin, shell pink, black and gold.
Using a felt applicator, daub all over your crackled chipboard. This is a very random an individual technique
.

 I coloured the shoe using Distress ink Fired Brick and applied with a dauber for better control.
I used a black sharpee pen for the flourish and added some bling.
I also coloured the titled with the black sharpee and then used glossy accents to lift the colour.


I have passed my shoe obsession onto my daughter and seeing as I no longer feel comfortable in high heels I live vicariously through her.

I am going to try this technique on a more solid piece of chippy too just to see the effect better I think.

Have Fun everyone,
Trace


October 8, 2012

Charlene's "A Moment In Time Christmas" Frame

Today the very Talented  Charlene Camilleri shares with us her fabulous tutorial on
how to make this stunning Christmas Frame.........


A MOMENT IN TIME CHRISTMAS FRAME with Charlene Camilleri
 
Twiddleybitz Product List
SPK005 Steampunk Clock with Gears
CF003 Roman Clock with hands
CF002 Roman Clock Small
SNOW001 Snowflakes
XMAS039 Swirl Stars
MIR004 Mini Mirror Christmas Trees
Twiddleybitz Element- Button
 
Other Materials Used
Photo Frame
Ranger Dabber Paints- Snow Cap, Juniper & Gold
Martha Stewart Crystal Fine Glitter
Stampendous Shaved Ice & Mica Flakes
Stampendous Embossing Enamels- Shabby Green, Aged Copper
Stamp It Christmas Stamp
Teresa Collins Christmas Cottage Paper
Silver Beaded Trim
 
Remove the backing and glass from your frame ( I used an Ikea Frame which measured 9x11 ¼ inch but any old frame will do ).
Brush some PVA glue around the bevelled edge of the frame and sprinkle mica flakes onto it.


Using the Juniper Dabber, paint the large Roman Clock and Swirl Star simply by “dabbing” the paint directly to the chipboard.
Set the star aside, now lets add some more character to the Clock... Randomly dab some of the Gold
paint over the clock. Try not to over think it or “perfect” it. The less perfect the more character!


Next apply some PVA to the centre circle area of the clock and sprinkle with shaved ice. Shake off any excess. Paint the clock hands gold then glue the hands into place and add the button to the top.


Now for the smaller clock- stamp the chipboard with an embossing Ink Pad then apply the Aged Copper Embossing Enamel. Shake the excess off then use a heat gun to melt the powder. Use this same process for the Steampunk Clock using the Shabby Green Embossing Enamel.


Paint the Snowflake with the Snow Cap paint, dry then apply some glue ( I find a glue pad to be perfect for this job as you simply stamp the glue then apply the glitter ).
 
Use a brown permanent ink ( I like to use Stazon Brown Timber ) and ink the Xmas Stamp. Stamp onto paper, ensuring you press firmly and evenly before raising the stamp. Cut around the stamp and lightly ink the edge using the Gold Dabber.
 
 
Within your frame you will have a frame insert, cover this with your desired patterend paper and carefully cut around the paper with a craft knife. Now apply tape or glue to the back and attach another piece of patterned paper.
 
 
Now it's time to put it all together!
Re-insert the frameYou do not need to reinsert the glass- I have not used it.
Use foam tape to attach your large Roman Clock to the bottom left hand corner. Use glue to attach the other two clocks as shown.
Use foam tape to attach the stamped clock to the top right corner. Glue the silver beaded trim, star, snowflake & Christmas tree as shown.
 
Enjoy your new Frame!
 
 
I hope you enjoyed this tutorial. You can use this same idea with different themes and it is a great way to use up some old frames that are sitting around!! I would love to see your designs in the Gallery!
 
Charlene